Friday, December 21, 2012

How to enable and use SSIS logging in a SQL server table, part I


This article describes how to enable loggin in SSIS to a SQL server table and how to log the package start and stop time.

Prerequisites

To log the package start and stop time, and various other events and data, I will use a SQL server database, to which my SSIS account has administrative rights to create a table and insert records into it. The logging procedure will create the table dbo.sysssislog when not available. Then it will add records to it as described below.

Walkthrough

  • Create an OLE DB connection called MyLogging
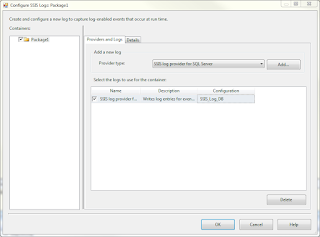
  • In the VS2008 menu choose SSIS / Logging… For ‘Provider type’ select  SSIS log provider for SQL server and click Add.
  • The Log provider is shown in the ‘Select the logs to use for the container’ list.
  • In the ‘Configuration’ column select the connection MyLogging from the dropdown.
  • In the ‘Containers’ treeview click the checkbox near the top Container.  in the ‘Select the logs to use for the container’ list click the checkbox near the SSIS log provider. Without further settings, this is enough to generate a Package start and Package end log record. The recording will occur in the table called dbo.sysssislog


Monday, December 10, 2012

Re-use code in SSIS by using RAW file source and destination


Problem

An SSIS package needs to import different versions of text files into a single database table. The versions of the text files differ by having some additional fields at the end of each line. The text files are comma separated and have a header line that contains the versions number.


Simple solution

In the beginning I had only one version. Later a 2nd version of the text file needed to be imported. To keep things simple and develop something the worked, I defined a new flat file connection and created a second dataflow that converted the columns from the text file into the proper format for the database table. So I had 2 data flows that were almost the same except for some additional fields in newer version of the file. Then came a 3rd version of the text file with yet another field added and I decided not to copy the data conversions and derived columns any longer, but to look at a solution that handles the dataconversions and derivations for all corresponding columns of the 3 versions into one dataflow. I had never used the Raw File source/destination before but this looked like a good example of where to make use of it.


Raw File Solution

Connections

There are 3 different flat file connection managers.


Control Flow

The flat files are treated in a For Each Loop container.
The first component in the For Each Loop container is a Script Task that reads the first line of the file and evaluates the version number. The version number is stored in the first row of the file.
The 3 different files are read in 3 different data flows and written to a Raw File Destination that contains all the columns of the latest version.  Then the RAW file is read processed uniformly in a 4th Data Flow and output is sent to the database.

Data Flows

The Data Flow for version 3 of the text files has to read all columns as they are and write to the Raw File Destination.

For version add a derived column component for the missing columns, with NULL or default values, then write to the Raw File Destination.

For version 2 add a derived column component to add the missing columns of version 3. Then write to the same Raw File Destination.
In the Control Flow the 3 separate Data Flows are brought together in one 4th Data Flow. This one reads the Raw File Source, does all necessary conversions, derives columns, lookups and more. The result is written  into the destination table.


To create the raw file

To use the raw file in the 4th Dataflow as Source, you will need to create it, by test running the package Data flow for version 3 with an existing version 3 file at hand. This step will create a raw file that you then use as Raw File Source in the design of the 4th data flow.


Conclusion

The logic for the 3 different file versions is defined only once in the 4th Data Flow.

Tuesday, December 04, 2012

Incorporating field data from a related table from a 2nd database into a Reporting Services report

Problem

How does one build a report based on data from one database, and incorporate lookup data from a related table from another database?
The 1st database holds facts data, the other database has a dimension table. The report is grouped by a category code that is used in the facts table, but the descriptive name of the categories (dimension) is stored in another database. The 2nd database does not necessarily reside on the same SQL server as the 1st database. Both databases and reporting services are SQL 2008 R2 versions.

Solution

There is more than one solution to this problem. 
When both databases reside on the same server and will continue to do so, then you can design the report with a single Data source and single Dataset, the query specifies the database names.
If the 2nd database resides on another server, you could add a linked server to the 1st server and still use the same solution as mentioned above.
If the 2nd database resides on another server and you do not have the rights to add a linked server on the 1st server, although you would expect other developers have experienced the same problem and also felt the need for a linked server.
When an IIS server is available web services can be created to load data from both databases.
With no IIS server available and no admin rights on the SQL servers I opted for the solution with 2 datasets and 2 data sources. The report will use a lookup expression in one of the tablix cells to read the data from the related dimension table.

Walkthrough

  • Create a report server project with VS 2008.
  • Create 2 Shared Data sources
    • 1st datasource connects to facts tables and is called ‘dsrc_fact’
    • 2nd datasource connects to dim tables and is called ‘dsrc_dim’
 
  • Add a new report
    • Use the shared datasource ‘dsrc_fact’
    • Create a query that selects the necessary fields from the fact table.
    • SELECT DivisionId, CustomerNr, Surname, Firstname, Street, Pcode, City, Country FROM dbo.Customer
    • DivisionId is the key to the Dimension table in the second database.
    • Create a Tabular report, grouped by the DivisionId.
    • Call the report ‘CustomerByDivision’

    • In the Report Data we see one Data source and one Dataset.
  • Because I used the report wizard, my dataset is called DataSet1, rename it to ‘dset_Customer’.
  • In the Report Data pane, add a 2nd Data source
    • Use the shared data source ‘dsrc_Dim’ and give it the same name again.
  • In the Report Data pane, add a 2nd dataset
    • Call the dataset: ‘dset_Division’
    • Use a dataset embedded in the report
    • Data source: dsrc_Dim
    • Query type: text
    • Query:SELECT DivisionId, DivisionName FROM  dbo.Division
  • Now there are 2 data sources and 2 datasets in the Report Data pane.

  •  In the report group header we can add an expression to lookup the corresponding Division name in the 2nd datasource.
    • Right-click on the group header cell next to the DivisionId cell, select ‘Expression…’ from the dropdown menu.

    • In the expression dialog box, type the following expression
    • =Lookup(Fields!DivisionId.Value, Fields!Id.Value, Fields!Name.Value, "dset_Division")
    • Reminder: the lookup function can be found in the Category ‘Common Functions/Miscellaneous’, Item ‘Lookup’.  The first lookup argument refers to the key field from the 1st dataset, the 2nd lookup argument refers to the corresponding key field from the 2nd dataset, the 3rd argument is the field value from the 2nd dataset that needs to be returned by the Lookup function, and the last argument is the name of the dataset where Lookup needs to look.
  • In the preview of the report the result is shown. Alongside each Division Id we see the corresponding division name.


Remark

With this easy solution, sorting can only be done on the Division Id , not on the Division name.

Monday, December 03, 2012

Reporting services where to find the property to repeat a group header on every page

Since it was some time ago that I had to create a report with a group header that must be repeated on top of every page, I had to dig up an article that explains how to accomplish it. Compared to other reporting tools it is not that obvious in Reporting services. The clue is to open the advanced mode in the 'row groups' and 'column groups' panes.
The solution comes from an an article on MSDN:

To repeat rows with column headings for a table with row groups
  1. In Design view, select the table. The Grouping pane displays the row groups.
  2. On right side of the Grouping pane, click the down arrow, and then clickAdvanced. The Grouping pane displays static and dynamic tablix members for each group. You can only set properties on a static tablix member.
  3. In the Row Groups pane, click the static tablix member for the row that you want to repeat. When you select a static tablix member, the corresponding cell on the design surface is selected, if there is one. The Properties pane displays the properties for the selected tablix member.
  4. Set the KeepWithGroup property in the following way:
    • For a static row that is above a group, click After.
    • For a static row that is below a group, click Before.
  5. Set the RepeatOnNewPage property to True.
  6. Preview the report. If possible, the row repeats with the group on each vertical page that the row group spans.

View a SQL Server Reporting Services Report in LightSwitch

Sql server Reporting Services report

This article on MSDN gives a rudimentary but working solution on how to view a SQL Server Reporting Services Report in LightSwitch. The solution works for both Lightswitch apps: web app or desktop app.

Update

Yann Duran wrote an interesting article: Add a Web Page URL to LightSwitch's Navigation Menu

Sunday, December 02, 2012

XtraReports for LightSwitch does not group on Date fields – convert date to string makes it work

This week I had to create a complex report with 3 group levels and further sorting on 4 detail fields. The problem was that the 3rd group field was a date field, and the report never grouped on the date field, but created a new group with the same data field with each detail line. To exclude an obvious mistake: The dates do not contain any time data, they are purely dates.

E.g In the Northwind database you have a Categories, Products, Sales. The report would be grouped on Category name, Product name, Salesdate. The detail would be sorted on 3 other numerical fields.

The project is written in VS 2010 with LightSwitch 2011 and DevExpress XtraReports 11.1.

This is the result I would like to see

  • Beverages
    • Chai
      • 2010-01-12
        • 12,00 13,20 10,00
        • 12,00 15,01 12,00
        • 13,00 13,25 12,12
      • 2010-01-13

The problem was that the report never came out like that, instead

This is what I saw in the XtraReports print preview

  • Beverages
    • Chai
      • 2010-01-12
        • 12,00 13,20 10,00
      • 2010-01-12
        • 12,00 15,01 12,00
      • 2010-01-12
        • 13,00 13,25 12,12
      • 2010-01-13

Of course, my subtotals for the day (not shown here) were completely wrong too.

Solution: add computed property to convert date into string, the group on computed property

After checking the dates do not contain any hour information (and they did not). After having tried setting all kinds of combinations in the group and sorting properties, I decided to take another approach. In the Lightswitch datasource that served as the LightSwitchDataSource for the report, I added a computed field to convert the date field into a string like yyyyMMdd.

Here is an example of the Method for the computed property groupSalesdate:

partial void groupSalesdate_Compute(ref string result)
{
result = this.Salesdate.ToString("yyyyMMdd");
}

In my XtraReport designer, I replaced the group field for the 3rd level by the computed field. The field that is displayed can remain as it is , so that the date field can be formatted properly.


The final result is what I needed:


  • Beverages


    • Chai


      • 2010-01-12


        • 12,00 13,20 10,00


        • 12,00 15,01 12,00


        • 13,00 13,25 12,12


      • 2010-01-13


Remark


I have not tried this yet with VS2012 and DeveXpress release for 2012.