Friday, December 21, 2012

How to enable and use SSIS logging in a SQL server table, part I


This article describes how to enable loggin in SSIS to a SQL server table and how to log the package start and stop time.

Prerequisites

To log the package start and stop time, and various other events and data, I will use a SQL server database, to which my SSIS account has administrative rights to create a table and insert records into it. The logging procedure will create the table dbo.sysssislog when not available. Then it will add records to it as described below.

Walkthrough

  • Create an OLE DB connection called MyLogging
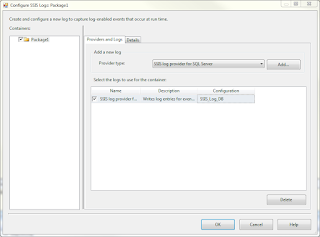
  • In the VS2008 menu choose SSIS / Logging… For ‘Provider type’ select  SSIS log provider for SQL server and click Add.
  • The Log provider is shown in the ‘Select the logs to use for the container’ list.
  • In the ‘Configuration’ column select the connection MyLogging from the dropdown.
  • In the ‘Containers’ treeview click the checkbox near the top Container.  in the ‘Select the logs to use for the container’ list click the checkbox near the SSIS log provider. Without further settings, this is enough to generate a Package start and Package end log record. The recording will occur in the table called dbo.sysssislog


Monday, December 10, 2012

Re-use code in SSIS by using RAW file source and destination


Problem

An SSIS package needs to import different versions of text files into a single database table. The versions of the text files differ by having some additional fields at the end of each line. The text files are comma separated and have a header line that contains the versions number.


Simple solution

In the beginning I had only one version. Later a 2nd version of the text file needed to be imported. To keep things simple and develop something the worked, I defined a new flat file connection and created a second dataflow that converted the columns from the text file into the proper format for the database table. So I had 2 data flows that were almost the same except for some additional fields in newer version of the file. Then came a 3rd version of the text file with yet another field added and I decided not to copy the data conversions and derived columns any longer, but to look at a solution that handles the dataconversions and derivations for all corresponding columns of the 3 versions into one dataflow. I had never used the Raw File source/destination before but this looked like a good example of where to make use of it.


Raw File Solution

Connections

There are 3 different flat file connection managers.


Control Flow

The flat files are treated in a For Each Loop container.
The first component in the For Each Loop container is a Script Task that reads the first line of the file and evaluates the version number. The version number is stored in the first row of the file.
The 3 different files are read in 3 different data flows and written to a Raw File Destination that contains all the columns of the latest version.  Then the RAW file is read processed uniformly in a 4th Data Flow and output is sent to the database.

Data Flows

The Data Flow for version 3 of the text files has to read all columns as they are and write to the Raw File Destination.

For version add a derived column component for the missing columns, with NULL or default values, then write to the Raw File Destination.

For version 2 add a derived column component to add the missing columns of version 3. Then write to the same Raw File Destination.
In the Control Flow the 3 separate Data Flows are brought together in one 4th Data Flow. This one reads the Raw File Source, does all necessary conversions, derives columns, lookups and more. The result is written  into the destination table.


To create the raw file

To use the raw file in the 4th Dataflow as Source, you will need to create it, by test running the package Data flow for version 3 with an existing version 3 file at hand. This step will create a raw file that you then use as Raw File Source in the design of the 4th data flow.


Conclusion

The logic for the 3 different file versions is defined only once in the 4th Data Flow.

Tuesday, December 04, 2012

Incorporating field data from a related table from a 2nd database into a Reporting Services report

Problem

How does one build a report based on data from one database, and incorporate lookup data from a related table from another database?
The 1st database holds facts data, the other database has a dimension table. The report is grouped by a category code that is used in the facts table, but the descriptive name of the categories (dimension) is stored in another database. The 2nd database does not necessarily reside on the same SQL server as the 1st database. Both databases and reporting services are SQL 2008 R2 versions.

Solution

There is more than one solution to this problem. 
When both databases reside on the same server and will continue to do so, then you can design the report with a single Data source and single Dataset, the query specifies the database names.
If the 2nd database resides on another server, you could add a linked server to the 1st server and still use the same solution as mentioned above.
If the 2nd database resides on another server and you do not have the rights to add a linked server on the 1st server, although you would expect other developers have experienced the same problem and also felt the need for a linked server.
When an IIS server is available web services can be created to load data from both databases.
With no IIS server available and no admin rights on the SQL servers I opted for the solution with 2 datasets and 2 data sources. The report will use a lookup expression in one of the tablix cells to read the data from the related dimension table.

Walkthrough

  • Create a report server project with VS 2008.
  • Create 2 Shared Data sources
    • 1st datasource connects to facts tables and is called ‘dsrc_fact’
    • 2nd datasource connects to dim tables and is called ‘dsrc_dim’
 
  • Add a new report
    • Use the shared datasource ‘dsrc_fact’
    • Create a query that selects the necessary fields from the fact table.
    • SELECT DivisionId, CustomerNr, Surname, Firstname, Street, Pcode, City, Country FROM dbo.Customer
    • DivisionId is the key to the Dimension table in the second database.
    • Create a Tabular report, grouped by the DivisionId.
    • Call the report ‘CustomerByDivision’

    • In the Report Data we see one Data source and one Dataset.
  • Because I used the report wizard, my dataset is called DataSet1, rename it to ‘dset_Customer’.
  • In the Report Data pane, add a 2nd Data source
    • Use the shared data source ‘dsrc_Dim’ and give it the same name again.
  • In the Report Data pane, add a 2nd dataset
    • Call the dataset: ‘dset_Division’
    • Use a dataset embedded in the report
    • Data source: dsrc_Dim
    • Query type: text
    • Query:SELECT DivisionId, DivisionName FROM  dbo.Division
  • Now there are 2 data sources and 2 datasets in the Report Data pane.

  •  In the report group header we can add an expression to lookup the corresponding Division name in the 2nd datasource.
    • Right-click on the group header cell next to the DivisionId cell, select ‘Expression…’ from the dropdown menu.

    • In the expression dialog box, type the following expression
    • =Lookup(Fields!DivisionId.Value, Fields!Id.Value, Fields!Name.Value, "dset_Division")
    • Reminder: the lookup function can be found in the Category ‘Common Functions/Miscellaneous’, Item ‘Lookup’.  The first lookup argument refers to the key field from the 1st dataset, the 2nd lookup argument refers to the corresponding key field from the 2nd dataset, the 3rd argument is the field value from the 2nd dataset that needs to be returned by the Lookup function, and the last argument is the name of the dataset where Lookup needs to look.
  • In the preview of the report the result is shown. Alongside each Division Id we see the corresponding division name.


Remark

With this easy solution, sorting can only be done on the Division Id , not on the Division name.

Monday, December 03, 2012

Reporting services where to find the property to repeat a group header on every page

Since it was some time ago that I had to create a report with a group header that must be repeated on top of every page, I had to dig up an article that explains how to accomplish it. Compared to other reporting tools it is not that obvious in Reporting services. The clue is to open the advanced mode in the 'row groups' and 'column groups' panes.
The solution comes from an an article on MSDN:

To repeat rows with column headings for a table with row groups
  1. In Design view, select the table. The Grouping pane displays the row groups.
  2. On right side of the Grouping pane, click the down arrow, and then clickAdvanced. The Grouping pane displays static and dynamic tablix members for each group. You can only set properties on a static tablix member.
  3. In the Row Groups pane, click the static tablix member for the row that you want to repeat. When you select a static tablix member, the corresponding cell on the design surface is selected, if there is one. The Properties pane displays the properties for the selected tablix member.
  4. Set the KeepWithGroup property in the following way:
    • For a static row that is above a group, click After.
    • For a static row that is below a group, click Before.
  5. Set the RepeatOnNewPage property to True.
  6. Preview the report. If possible, the row repeats with the group on each vertical page that the row group spans.

View a SQL Server Reporting Services Report in LightSwitch

Sql server Reporting Services report

This article on MSDN gives a rudimentary but working solution on how to view a SQL Server Reporting Services Report in LightSwitch. The solution works for both Lightswitch apps: web app or desktop app.

Update

Yann Duran wrote an interesting article: Add a Web Page URL to LightSwitch's Navigation Menu

Sunday, December 02, 2012

XtraReports for LightSwitch does not group on Date fields – convert date to string makes it work

This week I had to create a complex report with 3 group levels and further sorting on 4 detail fields. The problem was that the 3rd group field was a date field, and the report never grouped on the date field, but created a new group with the same data field with each detail line. To exclude an obvious mistake: The dates do not contain any time data, they are purely dates.

E.g In the Northwind database you have a Categories, Products, Sales. The report would be grouped on Category name, Product name, Salesdate. The detail would be sorted on 3 other numerical fields.

The project is written in VS 2010 with LightSwitch 2011 and DevExpress XtraReports 11.1.

This is the result I would like to see

  • Beverages
    • Chai
      • 2010-01-12
        • 12,00 13,20 10,00
        • 12,00 15,01 12,00
        • 13,00 13,25 12,12
      • 2010-01-13

The problem was that the report never came out like that, instead

This is what I saw in the XtraReports print preview

  • Beverages
    • Chai
      • 2010-01-12
        • 12,00 13,20 10,00
      • 2010-01-12
        • 12,00 15,01 12,00
      • 2010-01-12
        • 13,00 13,25 12,12
      • 2010-01-13

Of course, my subtotals for the day (not shown here) were completely wrong too.

Solution: add computed property to convert date into string, the group on computed property

After checking the dates do not contain any hour information (and they did not). After having tried setting all kinds of combinations in the group and sorting properties, I decided to take another approach. In the Lightswitch datasource that served as the LightSwitchDataSource for the report, I added a computed field to convert the date field into a string like yyyyMMdd.

Here is an example of the Method for the computed property groupSalesdate:

partial void groupSalesdate_Compute(ref string result)
{
result = this.Salesdate.ToString("yyyyMMdd");
}

In my XtraReport designer, I replaced the group field for the 3rd level by the computed field. The field that is displayed can remain as it is , so that the date field can be formatted properly.


The final result is what I needed:


  • Beverages


    • Chai


      • 2010-01-12


        • 12,00 13,20 10,00


        • 12,00 15,01 12,00


        • 13,00 13,25 12,12


      • 2010-01-13


Remark


I have not tried this yet with VS2012 and DeveXpress release for 2012.

Friday, November 30, 2012

SSIS Control flow with Precedence constraints need to come together

Problem:
  • When developing in an SSIS For each loop, e.g. process a set of files in a directory.
  • Where different actions need to be undertaken depending on the file type
  • And Precedence constraints are used to accomplish those different actions in separate dataflow tasks.
  • After the separate dataflow tasks, link those to one more tasks common to all constraints.
  • Then: the result will be that the common tasks are never executed.
Example:
  • In the example The Move the File task will not be executed.
Cause:
  • Constraint expressions not only work at the exit of a task. The are also active at the entry of a task.
  • In the example: the 2 green arrows pointing to the common task 'Move the file' need to be valid simultaneously, before the common task gets executed. But it is either File type A or file type B that gets processed in one iteration of the Foreach file loop.
Solution:
  • Double click the green arrow going from 'process type A' to 'Move the file'.
  • Change the Multiple constraints property from logical AND to logical OR.
  • The green line will change to a dotted green line, for both tasks A and B.
Example:


Check VAT numbers Webservice hosted by EU

There is a webservice hosted by the European Union to check VAT numbers for any of the member states: http://ec.europa.eu/taxation_customs/vies/checkVatService.wsdl

An example of how to make use of this in Visual Studio was written VIES VAT number checker by Christian Kleinheinz.

Thursday, November 22, 2012

SQL Server Maintenance Solution

Introduction

Because we needed additional processing power some databases need to be migrated to a new server. On the current server we have a 3rd party database maintenance tool that works well for keeping the database indexes and table healthy. I discovered that we do not have any more licenses for the new server. The SQL 2008 R2 maintenance plans are rather simple and do not provide the fine tuning tools essential to run the maintenance plans efficiently and with as little time necessary. Some of those databases are nearly 24 hours per day.

SQL Server maintenance solution

The need for an extra license has been reported to management. While they decide on buying an extra license or not, I searched the internet for available and workable tools for free. The SQL Server Maintenance Solution by Ola Hallengren seems to fit what is needed for the time being.

The SQL Server Maintenance Solution is essentially a SQL server script to run on your server.

Installation

  • Download the script from Downloads at Ola's site, it is called MaintenanceSolution.sql
  • Start SSMS and connect to the database server. You need to have sysadmin rights.
  • Open the script file MaintenanceSolution.sql. The script uses the master database.
  • To create jobs, edit the lines32 and 33, leave line 31 with @CreateJob = “Y”. In my case we use the R drive on the server
SET @BackupDirectory     = N'R:\Backup' -- Specify the backup root directory.
SET @OutputFileDirectory = N'R:\Log' -- Specify the output file directory. If no directory is specified, then the SQL Server error log directory is used.


  • · Further down the script there is code to create 11 jobs. To distinguish these jobs from other jobs that are defined on the server, I inserted the prefix ‘MNTSOL’ in the names of the jobs. That way they are more easily recognizable and they are listed together.

  • SET @JobName01 = 'MNTSOL DatabaseBackup - SYSTEM_DATABASES - FULL'
    SET @JobName02 = 'MNTSOL DatabaseBackup - USER_DATABASES – DIFF'
    Run the script

  • The script creates a number of tables and stored procedures in the master database


    • TABLE [dbo].[CommandLog]

    • FUNCTION [dbo].[DatabaseSelect]

    • PROCEDURE [dbo].[CommandExecute]

    • PROCEDURE [dbo].[DatabaseBackup]

    • PROCEDURE [dbo].[DatabaseIntegrityCheck]

    • PROCEDURE [dbo].[IndexOptimize]

clip_image002


  • Because @CreateJob = “Y” 11 jobs were created in the SQL Server Agent Jobs section.

clip_image004


  • The jobs use the table and stored procedures. They are not scheduled yet. They are not setup to send alerts.

Index Optimize job


As the first test I ran the Index Optimize job on the test server. The user databases are not quite large. The job ran for about 5 minutes. After which I opened the table dbo.CommandLog to see what was registered in there. I saw 6 records, for 4 different databases. Each row explained in detail what kind of action was undertaken on a particular index.

Example of a row in the CommandLog:


DatabaseName


Sales


SchemaName


fact


ObjectName


SalesOrder


ObjectType


U


IndexName


IX_SalesOrder


IndexType


2


StatisticsName


NULL


PartitionNumber


NULL


ExtendedInfo


<ExtendedInfo> <PageCount>666349</PageCount> <Fragmentation>99.1803</Fragmentation></ExtendedInfo>


Command


ALTER INDEX [IX_SalesOrder] ON [Sales].[fact].[SalesOrder] REORGANIZE WITH (LOB_COMPACTION = ON)


CommandType


ALTER_INDEX


StartTime


2012-11-22 10:48:13.717


EndTime


2012-11-22 10:48:16.833


ErrorNumber


0


ErrorMessage


NULL


Conclusion


This looks like a workable solution. I will keep on testing this during the upcoming days .

Saturday, November 10, 2012

LightSwitch 2011 out of browser app shows completely blank screen after installation

Problem

After a migration of a LightSwitch application with XtraReports to a new web server with Windows 2008 and IIS 7, and after installation of the out of browser application on the clients, the app starts up with a blank screen. No menus or status bar is shown at all.

Solution

Some kind of error must have happened, but no indication at all of what happened. I have read about the blank screen in fora on the internet: it involves setting the basic authentication to false. So I tried to follow the advice, but in the IIS manager for the LightSwitch website there was not even Basic authentication under the authentication options.

  • Basic authentication is not installed on the web server:
    • On the 2008 server, run Server Manager
    • Select Roles / Web Server (IIS), in the Role services pane, add the Basic Authentication role, (along with Windows Authentication)
    • image
  • Restart IIS Manager, select the LightSwitch web site
    • select Authentication, verify that the Basic Authentication is disabled
    • image

After setting Basic Authentication and stopping and starting the web server, I started the client app again, and this time I was shown a Silverlight dialog box with an error message: ‘Could not load file or assembly DevExpress.Xpf.V11.1.LightSwitch.Common.dll…’

To solve the real problem I had to manually copy this file from my development machine to the server under …Inetpub\wwwroot\Myapp\bin

Tuesday, October 02, 2012

Http Error 413 “Entity too large” when deploying report on SSL report server

Problem

A report written for SQL2005 SSRS in VS 2005, had to be modified, tested and deployed to a Windows 2003 server with IIS 6.0. When deploying the report with VS 2005 the following error came up:

Http Error 413 “Entity too large”

Solution

I found a solution for my problem in this technet document:

Client cannot renegotiate request and returns an HTTP 413 error

To run the cscript adsutil.vbs as given in the example:

  • log on to the Windows server with an account with admin rights
  • Find the adsutil.vbs script, in this case it was in C:\Inetpub\AdminScripts
  • open a Command promt window
  • run the command with a size large enough to accommodate the report (in my case 138 KB):
    cscript C:\Inetpub\AdminScripts\adsutil.vbs set w3svc/1/uploadreadaheadsize 204800
  • Now deploy the report again from your VS 2005 project;

Tuesday, September 25, 2012

Lightswitch error ‘Exception has been thrown by the target of an invocation’

Problem

This error message popped up after the Lightswitch 2011 application was deployed on a new server and when the application was started for the first time. The default screen comes up, but without data in the screen, then the messagebox with the error:

An error occurred while running the screen.
Error details: Exception has been thrown by the target of an invocation.

image

After clicking ‘Close Screen’ a second messagebox pops up with the message:

Invalid operation. Dispatcher has been stopped.

image

The problem in this case is not as much correcting the error, but finding out what the error actually is. To do so we need to turn diagnostics on

DIAGNOSE

To diagnose this kind of error in Lightswitch, diagnostics needs to be enabled. See the MSDN article How to: Enable Diagnostics

Since this problem did not occur on my development computer, but after deployment on the new Windows Server, we can turn the diagnostics on in the server without redeploying the solution. Either way do not forget to switch diagnostics off on the server once the cause of the error has been found.

To enable diagnostics on the server

The diagnostics feature will generate a Trace.axd file in the directory where the app is deployed.

  • Use IIS Manager and connect remotely or log on to the server and start IIS Manager on the server.
  • In the Connections treeview, under <your server>/sites/Default Web site/<your app>
  • In the features view, click on Application Settings
    image
  • In the Application settings pane, change Microsoft.LightSwitch.Trace.Enabled to true,
  • Set …trace.Lavel to Error
  • Set …trace.LocalOnly to false. If you leave this to true then you can only browse on the server to localhost to look at the diagnostics, in my case security settings on the server browser did not allow me to do this. So when set to false I can browse the trace file from the client PC.
  • This is the Applications settings panel after applying the changesimage
  • On the client PC browse to the app to invoke the error once more.
    http://myserver/myapp
  • Then browse to the same URL with the trace file name appended http://myserver/myapp/Trace.axd
    image
  • The last line of the trace log most probably contains the error information (in my case it did). Click on the view details link to open.
    image
  • The error shows that there is a SQLconnection problem.

Solution

finally the solution was that the SQLserver could not be connected from the new app server unless the full domain name was used. I fixed the connection string in visual studio accordingly and all worked fine.

Lightswitch deployment error: MSDEPLOYAGENTSERVICE could not be contacted

Problem

For the first time deployment of a Lightswitch application on a windows 2008 server, I received the following error message in the Visual Studio Error message panel:

Web deployment task failed.(Remote agent (URL http://bebrqsql01/MSDEPLOYAGENTSERVICE) could not be contacted. Make sure the remote agent service is installed and started on the target computer.)

Remote agent (URL http://bebrqsql01/MSDEPLOYAGENTSERVICE) could not be contacted. Make sure the remote agent service is installed and started on the target computer.

The server is a windows 2008 R2 server with IIS services and with the Lightswitch 2011 prerequisites installed as described in Configure a server to host LightSwitch (Visual Studio 2010).


Solution

Log on to the target server, check if the Web Deployment Agent service is started, set it to start automatically . After first time Installation server feature IIS Web server role, this service will not have been started. Start the service

image

Another possible cause can be that the username specified in the Publish Output tab of the Lightswitch Publish Application Wizard, does not belong to the local administrators of the Application server. Solve this by adding the user, or the group that he is in, to the local Administrators group on the application server.

Sunday, September 23, 2012

How to update query parameters on Xtrareport

Question

When an Xtrareport report in a Lightswitch project is based upon a query with parameters and new parameters have been added to the query after the report was designed, how do you update the report parameters?

Explanation

In Visual studio in logical view, modify the query to add new parameters.

Save the query and rebuild the project.

Switch to file view

go to Server folder

open the report in design modus

Select the Lightswitch datasource

In the properties panel, Click on the link Update QueryParameters

image

The parameters are now added to the Query Parameter Collection. You can verify this by clicking on the Ellipsis button next to the (Collection) text to open the dialog box with the parameters from the query.

image

Tuesday, September 18, 2012

Out-of-browser Lightswitch app keeps on showing the update to new version page and refuses to start

Problem

At one site I have a Lightswitch out-of-browser app that has been upgraded quite a lot. On one of the pc’s the app detects the latest version and shows the upgrade message to the new version in the browser, but after upgrading and restarting the app it keeps showing the upgrade page requesting the user to make the same upgrade again. At first I thought that the user had not used this app for a while and that the app was being upgraded one version at a time. But the upgrade page was showing the latest version number.

Uninstalling the app via the add / remove feature in the control panel, did not help. The app was reinstalled after browsing to the URL of the app on the server, but even then the upgrade page kept showing up.

Solution

The solution was to remove the app from the Silverlight Application Storage.

In the Windows Start menu go to All Programs / Microsoft Silverlight / Microsoft Silverlight. The configuration window opens.

image

Select the Application Storage tab.

image

Select the URL of your application and click on the Delete… button. A confirmation window opens. Click on Yes to confirm.

image

The app is now deleted from the Application Storage.

Click on the OK button to close the Silverlight Configuration window.

Start the app again. It will show the upgrade window once more and after installation, the latest version should start (in my case anyway).

First time installation of SSDT for VS2012– sep 2012 update

Prerequisites: PC with Visual Studio 2010 with SP1.

Download SSDT setup from MSDN SQL Server Data Tools

After download has finished run SSDTSetup.exe

image

This takes a long while, , VS2010 starts (did I start this accidentally while doing other work or was it the installer?) Minimizing the installer window works, but maximizing again does not work; although it still seems to be active.

Result: An important prerequisite is the installation of SQL 2012 Standard or higher and not mentioned by the site. SQL Express is not sufficient.

since none of my customers are using SQL 2012 I did not install it either. To be continued.

Interesting article on fuzzy string searching

an interesting article about Fuzzy String Searching in sqlservercentral. Thanks to Thomas Keller.

Thursday, August 16, 2012

XtraReports report viewer error : A control must be selected

Problem

After the upgrade to a new version of XtraReports, the screens to view a report preview show an error message: ‘Report Viewer: A control must be selected.’

image

Solution

In the screen design of the report viewer, see in the rows layout, under Screen command bar,

image

change the control from Custom control to ReportViewer control

image

Saturday, July 28, 2012

Windows live writer setup for blogger.com

I have installed windows live writer on a new Windows 7 system and registered the steps needed to connect Live Writer to my blog.

The Windows 7 and the Live Writer are installed in my native language Dutch, so the screenshots are all in Dutch too.

When Windows Live Writer is started up for the 1st time a Wizard dialog will ask the necessary details to connect to your blog.

For users of blogger.com (or blogspot.com for that matter, the connection is not one of the standard options, so select Other services. Click Next (Volgende).

 image

Add weblog account. Enter url for the weblog http://jandho.blogspot.com, username (your login account is an email address) and password. Next (Volgende).

clip_image002

Select weblog. I have 2 weblogs hosted on blogspot. I Select my standard blog here. Then click Next (Volgende).

clip_image004

The weblog is configured after w while and the last step offers the possibility of sending RSS feeds in Windows Live. When you want to do this click on the link with the green arrow. Click Finish (Voltooien) to finalize the configuration.

clip_image006

Windows Live writer opens, ready for a new blog article. The categories that you created in your blog site will be available in the list of categories.

Monday, July 09, 2012

Add a second filegroup to an existing SQL server database

GOAL

Standard SQL server databases are setup to use 2 files one for the data and one for the log. The data file is then part of the PRIMARY filegroup.

In my case there is a database with 3 types of tables:

  • lookup or dimension tables that hardly ever change
  • history tables that keep growing daily
  • work tables where a lot of inserting and deleting of records takes place.

To maintain the database the work tables need to be reorganized, the database files need to be shrunk. To avoid doing all the work of reorganizing and shrinking on one huge database file, I have decided to add a 2nd filegroup that will contain the work tables. This filegroup can then be reorganized more frequently than the one that contains other 2 types of tables. As and added advantage I have to option to store the filegroups on different disks if performance or storage space becomes an issue.

This article explains how to create a new filegroup before the tables are created. It does not explain how to migrate existing tables from one filegroup to another one.

Create a new Filegroup interactively with SqL Server Management Studio

  • Connect the object explorer to the SQL server.
  • In the object explorer right-click on the Database name, select Properties.
  • In the database properties window, under Select a page, select Filegroups.
  • Click on the Add button
  • In the Rows grid add the name of the filegroup, e.g. FILEGROUPWORK, leave Read-Only and Default unchecked
  • under Select a page, select Files
  • Click on the Add button
  • In the Database files grid
    • Logical Name: give a name that starts with the database name and ends with the same suffix as the fielgroup. e.g. MyDatabaseWORK.
    • File type: Rows data
    • Filegroup: select the new filegroup from the dropdown list, e.g. FILEGROUPWORK
    • Initial size: whatever you expect to be a good starting size
    • Autogrowth: whatever is needed to accommodate adding new data efficiently
    • Path: if nececessary the path can be different from the primary group.
    • Filename: use the same name as the Logical name and add the .NDF file extension.
  • Click OK to create the filegroup and close the database properties window.

Create a table in the filegroup INTERACTIVELY 

A default create table statement will create the table in the [PRIMARY] filegroup. When designeing a new table interactively, the designer window has a properties window in which you can select another filegroup from a dropdown.

alternatively if you create the table with a script, then the [PRIMARY] text must be replaced by the alternative filegroup name, e.g. [FILEGROUPWORK]

CREATE TABLE [Sales].[Currency](
    [CurrencyCode] [nchar](3) NOT NULL,
    [Name] [dbo].[Name] NOT NULL,
    [ModifiedDate] [datetime] NOT NULL,
 CONSTRAINT [PK_Currency_CurrencyCode] PRIMARY KEY CLUSTERED 
(
    [CurrencyCode] ASC
)WITH (PAD_INDEX  = OFF, STATISTICS_NORECOMPUTE  = OFF, IGNORE_DUP_KEY = OFF, ALLOW_ROW_LOCKS  = ON, ALLOW_PAGE_LOCKS  = ON) 
    ON [FILEGROUPWORK] 
) ON [FILEGROUPWORK]

Friday, June 29, 2012

Delete duplicate rows from a table with an identity column

T-SQL statement to delete duplicate rows from a table with an identtity column. When several records have equal data in other columns and only one record should be kept.

DELETE FROM dbo.TableA
WHERE Id NOT IN
(
SELECT MIN(Id)
FROM dbo.TableA
GROUP BY Column1, Column2 -- combination of columns that gives duplicates
)

Thursday, June 21, 2012

Create a new Team project in TFS from VS 2008

To create a new Team project folder in TFS, in which new solutions will be added.

Prerequisites

Visual Studio must be connected to a TFS server.

  • In Visual Studio select menu Team
  • Select connect to Team Foundation Server…
  • In the Connect to Team Project, select the Team foundation server, do not select a project.
  • click Connect

Procedure to create the TFS project

In VS 2008 file menu select New –> Team Project…

image

In the Connecti to Team Foundation Server, select the server that you have VS2008 connected to and click OK

image

In the New Team Project on <servername> dialog, enter a name for the Team project (the name has to be new for that server), click Next

image

In the next step choose a Process Template (I’ve used the first one available). click Next

image

In the settings for the project portal, specify the title of the team project portal (I use the same as the Team project name). Add a description. Click Next.

image

In the Specify Source Control Settings, select Create an empty source folder.

image

In the Confirm window, click Finish

image

A progress bar is displayed until the project has been completely created on the TFS server;

image

After a while (several minutes in muy case) the Created dialog appears, click on Close.

image

The TFS project is created with folders for Work items,… and Source control.

image

Add a Visual Studio 2008 Solution to the TFS project.

For simplicity I prefer to mirror my project structure under My Documents\Visual Studio 2008\Projects to the structure in the TFS project space. With Windows explorer I create a subfolder under the Projects folder with the same name as my TFS project. <MyTFS>.In this subfolder I will create new solutions and projects.

Create a solution and a project

With Visual Studio 2008 I create a new blank solution called MySln in the MyTFS subfolder. to this solution I add a new project MyPrj.

    • Visual Studio 2008
      • Projects
        • MyTFS
          • MySln
            • MyPrj

Once In TFS the result will be similar

  • MyTFS
    • MySln
      • MyPrj

Create a Source control Workspace

Before we add a solution to Team project, a new workspace has to be created with the Source control Explorer. Open the Workspace dropdown list and select Workspaces… at the bottom of this list.

image

This opens the ManageWorkspaces dialog. Click on the Add… button

image

In the Add Workspace dialog, give the Workspace the same name as the TFS project. In the first row of Working folders, set the status to 'Active. Set the Source control folder to the MyTFS folder. Set the local folder to My Documents\Visual Studio 2008\Projects\MyTFS

After a short while the workspace is created.

In the Source Control Explorer select the workspace you have just created. (Important, do not forget this before the next step)

Add visual studio solution to the source control

In the solution explorer, right click on the solution and select Add solution to Source control…

image

The solution will be added into the TFS project of the currently selected. The source files are not checked in yet, all files in the solution have a little plus sign in front of them, meaning that they are new and not yet checked in. Right click on the solution in the solution explorer and select 'Check in…

image

In the check in dialog, leave all checkboxes as checked and click on the Check In button. A progress bar is displayed while the files are being checked in. All the files now have a small lock in front of the name, meaning they have become read-only on your pc and they are checked in on the source control server.